Troubleshooting manual
Vokera Combi Boilers (Compact, Linea, Unica, Vision) are designed to provide hot water to your taps and heated water to your radiators. Normally central heating is controlled by both thermosat and by a time clock. Your Combi boiler will light whenever it receives a request from the time clock via thermostat or/and whenever a hot water tap is open. Most of boiler models don’t have a pilot light and are being lighted electronically. Whenever a serious fault occurs to your boiler, the gas supply to your appliance should be terminated at earliest. If you suspect a gas leak, you should immediately turn off the electrical and gas supply at the meter and contact your local gas supplier as well as your installer.
Before lightening your boiler you need to make sure that electrical supply and gas supply are switched on. You need to put the selector switch into ON position. Whenever there will be a request for heating or hot water via the time clock or programmer, your boiler will start an ignition sequence. Once your boiler reaches set CH temperature, the burner will stop for minimum 3 minutes and in the instances where temperature of central heating reached required level your boiler will turn off the burner automatically.
Don’t forget that your appliance should be cleaned with a clean damp or soft cloth. Don’t use water, any scouters or abrasive cleaning materials.
All Vokera Combi and most Vokera System boiler are equipped with frost protection function, that overrides the time controls, even and whenever it is switched off- when the temperature drops below 5 °C. Frost protection function will keep burner or/and pump operating until main water temperature reaches level of 35°C for central heating water and 55°C for hot water only. To sustain the frost protection function you need to provide your boiler with electrical supply at all times.
Attention! Your boiler was designed to protect the boiler itself and not the radiators or the whole heating system. If you want to protect the whole system you need to place additional controls on the system itself.
Boiler status indicators
Your boiler is equipped with min 2 status LED indicators, some models are equipped with LED displays. In appliances with the LED lamps only (no LED display) green light always indicates that the flame is present (there is a request for central heating or hot water), while the red light indicates boiler fault. In models with LED displays error message will appear on display itself
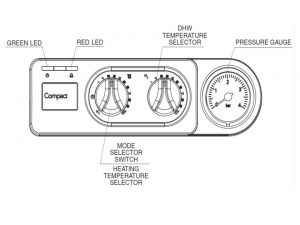
Whenever red light appear you will need to troubleshoot the appliance. Fault finding tables are included in the section below.
Table 1. General found finding codes based on LED lights illumination applicable for all Vokera models
| LED lamps | Cause | Action |
| Red illuminating, green off | high limit thermostat alarm | Reset the appliance. If the issue persists contact your installer or service specialist |
| Red illuminating green illuminating | system water pressure alarm | Check and refill system pressure. Reset the appliance and do all the checks. If the issue persists contact your installer or service specialist |
| Red illuminating, green off | safety shutdown alarm and/or internal fault | Reset the appliance. If the issue persists contact your installer or service specialist |
| Red off, green illuminating | temporary fault | No action associated |
| Red illuminating, green illuminating | service operation | No action associated |
| Red off, green illuminating | flame ON | No action associated |
| Red illuminating, green illuminating | fault sensors DHW | Reset the appliance. If the issue persists contact your installer or service specialist |
| Red off, green illuminating | fault sensors CH | Reset the appliance. If the issue persists contact your installer or service specialist |
| Red off, green illuminating | boiler stand-by | No action associated |
Table 2. Hot water and central heating function fault finding applicable for all models
| Fault | Action | Solution |
| No ignition | Verify HDW manifold functionality | Replace manifold |
| No ignition | Verify microswitch functionality | Replace microswitch |
| Pump not running | Verify pump functionality | Replace pump |
| No hot water | Verify teperature of water before burner goes off | Calibrate the appliance |
| No heating | Verify voltage accross modulator coil | Fit properly plug and socket joint |
| No heating | Remove connections from iron coil | Replace connections and iron coil |
| No heating | Strip, clear and replace modulator spindle | Replace gas valve |
Table 3. Vokera Compact fault finding table based on LED lights
| LED lamps | Cause | Action |
| Gren illuminating with frequency 0.5 second on /3.5 seconds off | boiler in standby, there is no flame | Wait for picking up normal functionality, restart the appliance |
| Gren illuminating with frequency 0.5 second on/0.5 second off | temporary stop of the appliance due to the following self- restoring faults |
Wait for picking up normal functionality, restart the appliance |
| Red illuminating with frequency 0.1 sec. on/ 0.1 sec. off | input/output function S.A.R.A. | Wait for picking up normal functionality, restart the appliance |
| Red fix | flame lockout | Contact your installer or service specialist |
| Red fix | air pressure switch intervention (after transient phase) | Contact your installer or service specialist |
| Red fix | NTC heating probe | Contact your installer or service specialist |
| Red fix | ACF electronic fault alarms | Contact your installer or service specialist |
| Red illuminating | limit thermostat intervention | Reset the appliance, if the issue persists contact your installer or service specialist |
| Green + red illuminating LED simultaneously | domestic water probe alarm | Reset the appliance, if the issue persists contact your installer or service specialist |
| Green + red illuminating LED simultaneously | water pressure switch alarm (after transient phase) | Reset the appliance, if the issue persists contact your installer or service specialist |
| Green and red LEDs illuminate alternatively | calibration in progress | Wait for picking up normal functionality, restart the appliance |
Table 4. General fault finding applicable for all models
| Fault | Action | Solution |
| Boiler not working | Verify if there is electricity from main switch | If not contact your electricity provider. If yes re-check adn fix supply, fuse and terminals to boiler connections |
| Boiler not working | Verify if there appliance is working at all | Open and check for a blockage: central heating valves, gas pipes, cold water inlet |
| No central heating circuit | Verify if boiler low fires at temp 55 degrees | Remove pink cable from 1 thermostat and and place it on 1A |
| No central heating circuit | Verify modulation circuit | Replace thermostat |
| Hot water not hot enough | Verify if burner lights | Check the gas rate and contact the gas provider |
| Hot water not hot enough | Verify if boiler works on high or low flame | Replace PCB |
Combustion analysis test
In order to perform combustion analysis test you need to open the hot water tap to its maximum, then set the summer operation mode on the selector, set the domestic hot water temperature selector to the maximum value. Take away the screws of cover of the combustion analysis inlet, put the power-probes to the appliance. Combustion can be checked only at the maximum output. After you carried out the test, close hot water taps, take away the probes and close the inlet.
Depending on boiler model you purchased and the time of the year (winter/summer) you will be able to choose/activate one (central heating) or two modes (central heating and hot water mode). In order to set the proper mode you should use “mode selector switch”. Its position is indicated on the picture above
- select hot water only position if you want the boiler to supply hot water only and no heating. This mode should be selected during the summer time. In order to set the right hot water temperature you need to move this selector to the right (move it clockwise) until you reach the desired temperature. If you would like to reduce the temperature of hot water you need to move the selector a bit back (counter clockwise) until you reach desired temperature. Boiler is operating within 37-80°C range
- select heating and hot water position if you want boiler to provide both. Your boiler will react to heating/hot water requests as it is set on the time-clock programmer, so you need to remember to set the proper times correctly and prior selecting this mode. In order to increase the heating temperature you need to move the heating selector temperature clockwise till the desired heating temperature is reached. In order to decrease the heating temperature you need to move the central heating temperature selector counter clockwise. Boiler for central heating is operating within 40°C-80°C range.
Attention! Your gas appliance was designed to meet the latest standards and operate properly for number of years. All Vokera boiler need an annual service to keep the standards and boiler functionality at a proper level. During the standard annual service your equipment may be re-calibrated, cleaned or have used parts replaced. At the end of service the Gas Safe Registered specialist will make a proper note in manual user book. It is user’s responsibility to schedule and obtain system pressure checks periodically. Don’t try to remove the boiler casing yourself or gaining internal access. Working on gas appliances without proper qualification is prohibited by law and is causing a life danger due to explosion or fire. Ask your service specialist how to isolate your appliance in case of emergency. Make sure that your appliance is not being used by children. Never block boiler ventilation channels or hang clothes over the appliance. Always make sure that the system pressure is set correctly to minimum of a 0.5-bar.
Re-pressuring the system
The system pressure should be checked periodically, as it is one of the basics for boiler proper operations. The needle on the gauge optimally should be located between 1 – 1.5 bar when the boiler is in an off position and has cooled down to room temperature. If the boiler system pressure is lower than 1 bar your system should be re-pressurized, it can be done by following the steps below:
1.Find connections of the filling valve under the boiler
2. Filling look should be attached into both connections
3. Slowly open the filling valve. You should hear the water while it enters the system
4. Now check if the pressure gauge needle is between 1-1.5 bar and if that is the case then close the filling valve
5. The filling loop should be removed from all the connections
If the system regularly requires re-pressuring or filling in, it may indicate a serious leak. Please contact your service specialist or local Gas Safe Registered specialist and require a system inspection.
Resetting your boiler manually
From time to time you will need to reset your boiler- especially after each an every time when the red light is flashing or LED display is showing an error message. To do it properly follow the steps below:
1.Write down error message, check what action should be taken to resolve the fault
2. Move the resetting on/off gauge into off position for approximately 2 min
3. The mode selctor gauge should be rotated across its position
Warning! If you observe that your gas boiler reuqres frequent reset, it is most probably a sign of more serious fault and you should contact Vokera customer service or installed
The heating temperature adjustment
Move the selector of the temperature – counter- clockwise to decrease, clockwise to increase– until the desired setting temperature is achieved. Leave up to 30 min for radiators to adjust. For all standard models the temperature range from maximum of 80°C to a minimum of 40°C to .
The hot water temperature adjustment
Move the selector of the temperature– counter-clockwise to decrease or clockwise to increase – until the desired setting temperature is achieved. The temperature range from from maximum of 80°C to a minimum of 37°C . In cases where the outlet water is still not hot enough you may still regulate/increase the temperature but reducing the water flow in the tap.
Attention! Whenever appliance fails to ignite during the sequence of ignition, your boiler will automatically go to a lockout status. Whenever this happens you need to let the appliance to cool down for at last 2 minutes before you re-set or restart the appliance.
Shutting down the system for a short period of time
For short period of time you can shut down both boiler and the system yourself by switching the time clock to the off position. We recommend to switch off the main water supply to the house.
Shitting down the system for longer periods of time
If your house won’t be used for a longer period of time, weeks or months, especially during the central heating period your system first needs to be drained. Only then the gas, water, and electricity supply can/should be switched off.
Modes of boiler’s operation
- heating mode is being activated whenever there is a demand for heat via the time clock and/or any external control. Whenever demand occurs the pump and fan will start and the fan speed will modulate till its receives the proper signal from PCB that the proper signal voltage was received. Once this happens ignition sequence will start and burner will produce stable flame. Once this is completed the electronic circuit will increase the gas rate- up to 75% for a period of around 15 minutes in order to fulfill the heat demand and its temperature. Whenever your gas boiler will reach re-set temperature, the burner will shut down. Three minute break will come alive in order to cool the appliance. Sometimes after the heat demand is satisfied the appliance fan and pump will continue working in order to release overheated air from the appliance itself.
- hot water mode is being activated whenever there is a demand for hot water (tap with hot water gets opened). Whenever demand occurs the fan will start and the air pressure switch will give the signal voltage to the control PCB. Ignition will start and stability of burner flame will be provided. Electronic circuit will increase the gas rate to maximum needed to get requested water temperature. Whenever your appliance exceeds pre-set or desired set point temperature burner is suppose to switch off for as long as it is needed for temperature to drop down. Sometimes after the heat demand is satisfied the appliance fan and pump will continue working in order to release overheated air from the appliance itself.
Parts replacement
Although this appliance was designed and produce to work reliably and trouble free, the lifetime of components is determined by such factors as usage and operating conditions. When a fault occurs, the fault finding section will assist in determining which component is functioning wrongly and should be replaced.
Warning! Before start to work on any Vokera boiler model set the boiler into OFF position, close valve that supplies fuel and isolate the supply of electricity. You should wait up to 20 min to let the boiler cool down. Pay special attention to the following safety rules:
- have a first-aid treatment case prepared and near to you
- work in a room with open window
- don’t put or hang anything next to or on a boiler itself
- immediately switch off the boiler if you suspect that it is not working properly, open the windows and ventilate the room
- avoid inhaling any gas related vapours or direct contact with gas with skin,
- in instances where hot water contacted skin flush it with a cold water for minimum few minutes, use anti-burning spray or cream and a lanolin-based barrier cream afterwards
You will need to gain general access to your appliance in order to remove and replace any faulty component. Before performing any work on your appliance isolate the appliance from the electrical supply and remove the fuse. Working on gas appliances without proper qualification is prohibited by law and is causing a life danger due to explosion or fire. To gain a general access to appliance you need to remove outer casing first and in most cases you will need to drain the water content from the appliance via the drain valve. When draining the boiler you need to make sure that there is no residual water that could drip from the appliance or removed component. After parts replacement always test for gas tightness, do all electrical and functional checks. Complete all commissioning checks: gas, electricity, polarity, water
Front case removal/ gaining general access
1. Find the 4 screws as shown on the picture
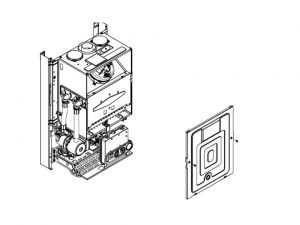
2. Remove air box front cover and put it aside till replacement part is not finished
3 Re-assemble in reverse order
Pump replacement
1. Isolate the appliance
2. Gain General Access. Remove outer case front panel
3. Now loose the outlet pipe of the pump (A). Disconnect and remove it from the connection of the pump combustion/ assembly chamber as shown on the picture below
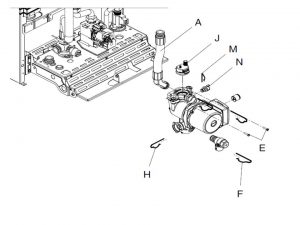
4. Remove the expansion pipe locking pin from the top of the pump assembly and withdraw the flexible pipe. Find the pressure gauge securing pin, remove it. Now disconnect from the pump assembly the pressure gauge
5. Disconnect the electrical wiring from the pump’s electrical connection point
6. Find and remove the 2 securing screws (E) at the rear of the pump assembly. Remove locking pin (F) from pump base and lift pump assembly clear of the hydraulic manifold. The pump assembly can now be removed from the appliance
7. Replace the pump
8. Re-assemble in reverse order
Safety valve replacement
1. Isolate the appliance
2. Gain General Access. Remove outer case front panel
3. Disconnect the outlet pipe from the safety valve
4. Ssafety locking pin of the valve should be removed from the hydraulic manifold
5. Replace safety valve
6. Re-assemble in reverse order
Automatic lower air release valve replacement
1. Isolate the appliance
2. Gain General Access. Remove outer case front panel
3. Rotate and remove the AAV assembly (J)- as shown on the picture above
4. Replace in the automatic lower air release valve
5. Re-assemble in reverse order
Water pressure switch
1. Isolate the appliance
2. Gain General Access. Remove outer case front panel
3. Remove the locking pin (M) from the water pressure switch (N)
4. Remove the wiring
5. Withdraw and replace the switch.
6. Re-assemble in reverse order
Flow thermistor replacement
1. Isolate the appliance
2. Gain General Access. Remove outer case front panel
3. Move upwards and remove the air chamber front cover. Move upwards the flow outlet pipe from the flow thermistor
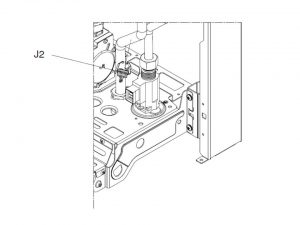
4. The thermistor electrical plug should now be disconnected
5. Replace the flow thermistor
6. Re-assemble in reverse order.
PCB replacement
1. Isolate the appliance
2. Gain General Access. Remove outer case front panel
3. Pull the control fascia forward and lower it
4. Push the clips (O) which secure the PCB cover, remove cover. Now write down all jumper tag configuration and all wiring connections
5. Unhook and remove connection block as shown on the picture below. All wiring should be disconnected from the PCB, find and remove all the securing screws of the PCB, afterwards you can remove the required PCB. Replace keeping reverse order logic. Make sure that that the position of the respective potentiometers on the PCB is correctly aligned with the position of the 2 control knobs
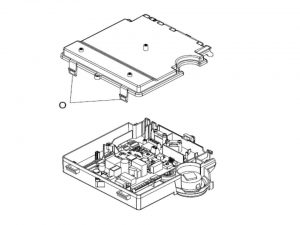
6. Make sure that correct tag jumper confirguration was placed
Attention! You will need to check the functioning of the PCB for the correct boiler type
Gas valve replacement
1. Isolate the appliance
2. Gain General Access. Remove outer case front panel
3. The gas valve must be changed as complete unit. The electrical plug and leads should be disconnected from the gas valve, loose first and then unscrew gas valve outlet and inlet pipes connections as shown on the picture below
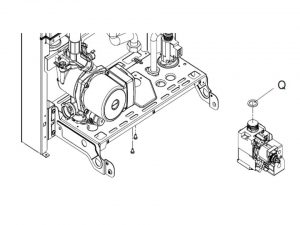
The old/ existing sealing washers (Q) need to be thrown out and new sealing washers should be put in place
4. Disconnect the compensation pipe from the gas valve
5. Remove and replace the gas valve
6. Re-assemble in the reverse order
7. Burner pressure setting should be verified and adjusted if needed.Warning! Afterwards s gas tightness test should be performed
Burner replacement
1. Isolate the appliance
2. Gain General Access. Remove outer case front panel
3. Unscrew and remove the air box front cover
4. Find and remove the six screws around the inner combustion cover and remove those
5. Disconnect the spark plug cable connection, slide off the lower cable grommet from the seat of the air distribution box as shown on the picture below
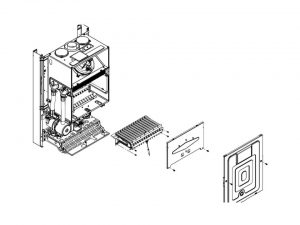
6. Remove the burner fixing screws and remove with the spark plug attached and corresponding cables
7. Replace the burner
8. Re-assemble in reverse order
Main heat exchanger replacement
1. Isolate the appliance
2. Gain General Access. Remove outer case front panel
3. Unscrew and remove the air chamber front cover
4. Find and remove the six screws around the inner combustion cover and remove
5. Remove locking pins and disconnect the pipes, from the flow and return connections on the heat exchanger. Disconnect the hot and cold connections on the heat exchanger as shown on the picture below
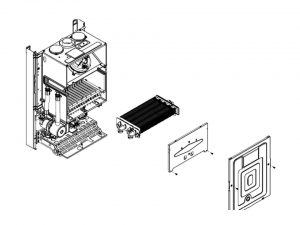
6. Disconnect the electrical plugs from the primary thermistor, the heat exchanger can now be withdrawn from the appliance
7. Replace the main heat echanger.
8. Re-assemble in reverse order. Make sure that all seals are in good condition, make sure they are replaced correctly
Automatic by-pass replacement
1. Isolate the appliance
2. Gain General Access. Remove outer case front panel
3. Remove the circulator as described
4. Withdraw the by-pass cartridge (S1) using a hooked piece of wire as shown on the picture
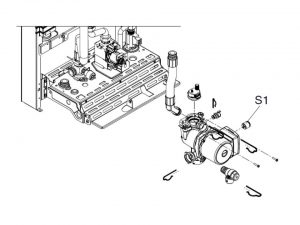
5. Make sure all seals are in good condition, make sure they are replaced correctly
6. Replace automatic by-pass
7. Re-assemble in reverse order, make sure that the cartridge is facing the correct way
Expansion vessel replacement
1. Isolate the appliance
2. Gain General Access. Remove outer case front panel
3. The flexible expansion pipe should be disconnected from the vessel as shown on the picture
4. Find and remove the screws that secure the vessel position
5. Remove the expansion
6. Replace
7 Re-assemble in reverse order. Pay attention when refitting the wiring to the air chamber. Make sure all seals are in good condition, make sure they are replaced correctly
DHW flow restrictor replacement
1. Isolate the appliance
2. Gain General Access. Remove outer case front panel
3. Remove the DHW inlet pipe from the DHW heat exchanger. Using a small screwdriver, gently ease the flow restrictor (C2)from its seating as shown on the picture below
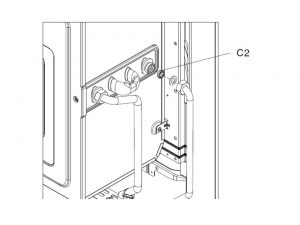
4. Replace the DHW flow restrictor
5. Re-assemble in reverse order. Make sure all seals are in good condition, make sure they are replaced correctly
DHW flow switch replacement
1. Isolate the appliance
2. Gain General Access. Remove outer case front panel
3. Remove the locking pin. Disconnect the inlet of the cold water pipe first from the DHW flow switch and then from the DHW heat exchanger. Remove both
4. Disconnect the wiring to the DHW flow switch. Slacken and unscrew the inlet connection. Unscrew the nut (E2) as shown on the picture below
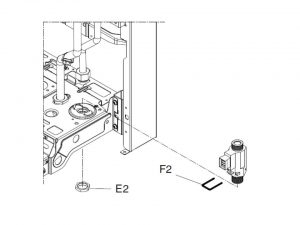
5. Lift the DHW flow switch housing from its seating
6. Remove the locking pin (F2) from the DHW flow switch, taking care not to lose the float contained within the housing.
7. Replace the DHW flow switch
8. Re-assemble in reverse order. Make sure all seals are in good condition, make sure they are replaced correctly
DHW thermistor replacement
1. Isolate the appliance
2. Gain General Access. Remove outer case front panel
3. Find and disconnect the electrical plugs from the DHW thermistor
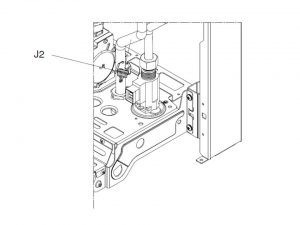
4. Gently lift the assembly of the thermistor (J2) from the DHW pipe outlet
5. Replace the DHW thermistor
6. Re-assemble in reverse order
Each Vokera boiler is equipped with a number of on board functions. We have sepcified some of the most common functions below
- anti-cycle function- this function ensures that the burner remains turned off for at least period of 3 minutes after the set point +5 degress for CH heat request
- frost protection- this function is active only when there are no requests for heating or HW. Whenever the temperature goes downs below 5°C, the boiler will operate on minimum power until the temperature of the thermistor reaches 35°C. Thereafter the pump & fan will over-run for 30-seconds
- pump anti-block function- this function is being activated when there was no heating or hot water request for minimm 24 hours. The pump will be activated for a period of 30 seconds
- SARA function- this function allows your appliance (whenever set-point of your appliance is within the SARA range) to automatically raise (adjust) the outlet heating flow temperature. Your room thermostat connections/programing will remain closed/ not active for more that 20 minutes
- CO function- once activated, will allow the appliance to run a t CH maximum, DHW maximum or minimum output whilst a combustion analysis check or a mechanical gas valve calibration is being carried out. However when this function is active all other functions like frost protection or anti cycle function are disabled. Once enabled, the CO function will remain active for a period of approximately 15 minutes or till the function is manually deactivated